OAuth 2.0 with Google
Use UniWebView to implement Google OAuth 2.0 authentication by setting up the component, handling callbacks, and managing token storage.
The following guide was last updated in October 2024. Please note that it may become outdated if the provider updates their user interface or workflow.
Creating an OAuth Client ID
We assume that you already have a valid Google Cloud account for development. Navigate to your project on Google Cloud, click APIs & Services -> Credentials (or use this link). Then click Create Credentials and select OAuth client ID.
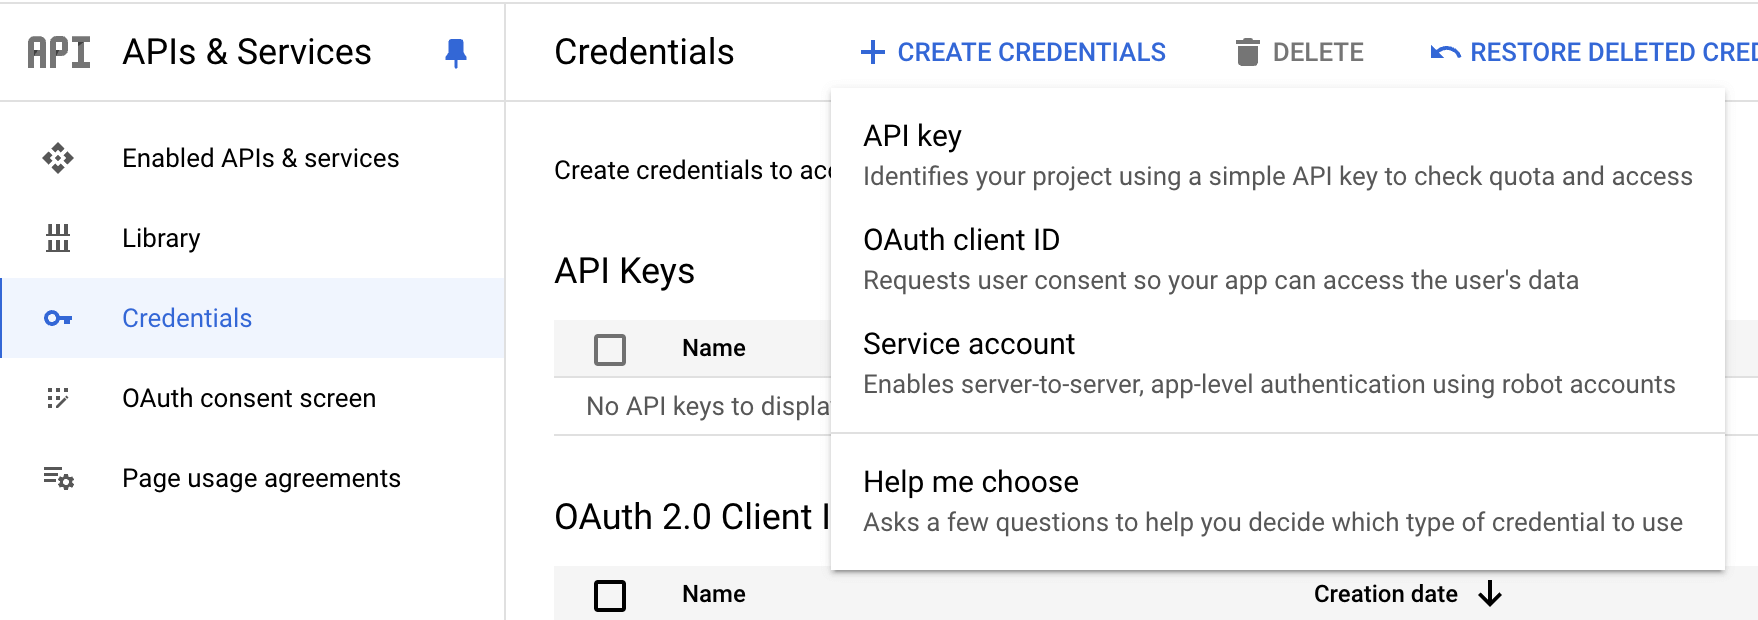
In the "Create OAuth client ID" window, choose iOS as the application type. Give a proper name to your application and fill in the bundle ID. You can leave all other fields empty for now. Click Create to generate an OAuth Client ID for your app.

Here, we created an iOS application as our OAuth Client. It can be used for testing purposes for both iOS and Android in UniWebView. However, if you also need to publish your game on Android, you may need to create another OAuth Client ID by choosing Android as the application type and filling in some platform-specific information (such as package name and signature) before it can pass Google's review for publishing.
In the next screen, you will get a new client ID value. It contains two components before a fixed Google domain suffix, in a format like this:
{number}-{token}.apps.googleusercontent.com
In this guide, we will use this Client ID value as an example:
1234567890-abcdefghijklmnopqrstuvwxyz.apps.googleusercontent.com
To allow a Google account to sign in to this newly created OAuth Client ID during the development phase, you also need to add a test account. Open the OAuth consent screen settings panel on the Google Cloud Console, and add any test accounts you need to the Test users section.
Adding Component
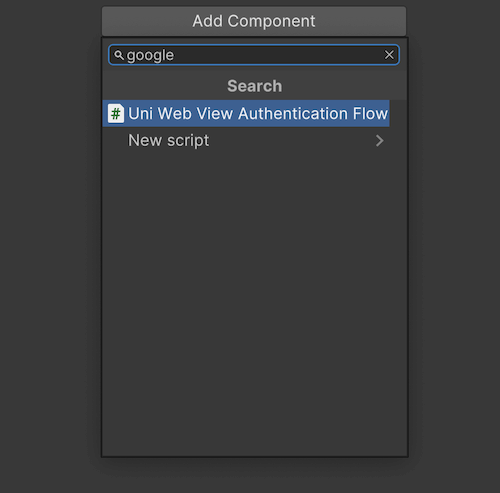
Add a UniWebViewAuthenticationFlowGoogle component to any game object in the scene. The easiest way is to click the Add Component button in the Inspector and search for "google":
Setting Properties
Next, fill in the necessary values for your app in the added UniWebViewAuthenticationFlowGoogle component. In this example, we need to set Client ID, Redirect URI, and Scope to the following values:
Field Value Client ID 1234567890-abcdefghijklmnopqrstuvwxyz.apps.googleusercontent.com Redirect Uri com.googleusercontent.apps.1234567890-abcdefghijklmnopqrstuvwxyz:/auth Scope https://www.googleapis.com/auth/userinfo.profile
Remember to replace the 1234567890-abcdefghijklmnopqrstuvwxyz part in Client ID and Redirect URI with the actual partial content of your Client ID. For the Scope field, we add the userinfo.profile scope to obtain basic user information. You may need to add more scopes to meet your requirements. Please check Google's documentation for the full list.

There are also some other options on the component. Typically, these include optional settings for the OAuth provider. For Google, leave PKCE Support and Enable State at their default values (S256 and "enabled"). These settings provide a secure client authentication flow.⬤
For a built-in supported provider, you only need to set the top-level properties to achieve a minimal available setup.
Setting Callback URL
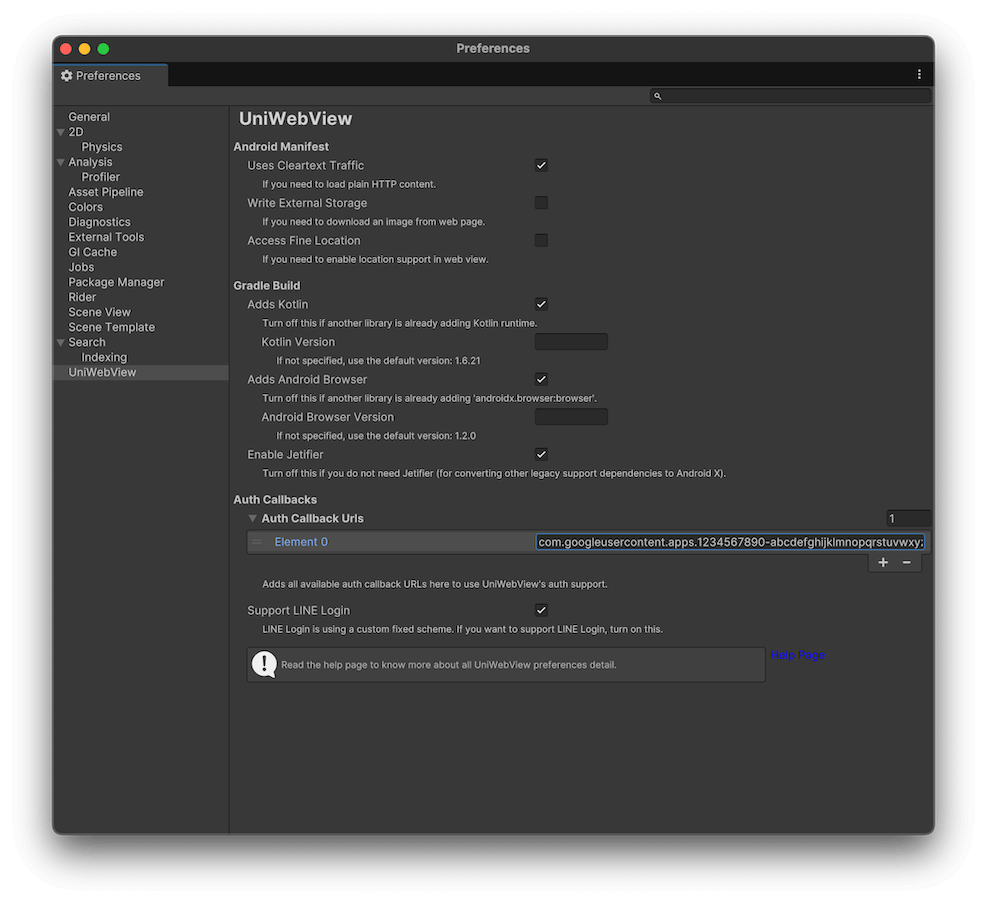
When users log in to the service with their accounts, the service will open the callback URL you set in the app. For OAuth 2.0 in a mobile app, this callback URL usually launches your app. To ensure this works globally in the app, you need to add the callback URL to UniWebView's preference panel.
Open the preference panel (Unity → Preferences) and find UniWebView in the sidebar. Then, expand Auth Callbacks URLs and add the callback URL (com.googleusercontent.apps.1234567890-abcdefghijklmnopqrstuvwxyz:/auth in this example) to the list:
Handling Result
Almost done! Now, you can add a handler to get the result of the authentication flow. This process is similar to the Unity.UI button action. You can prepare a method and assign it to the handlers list.
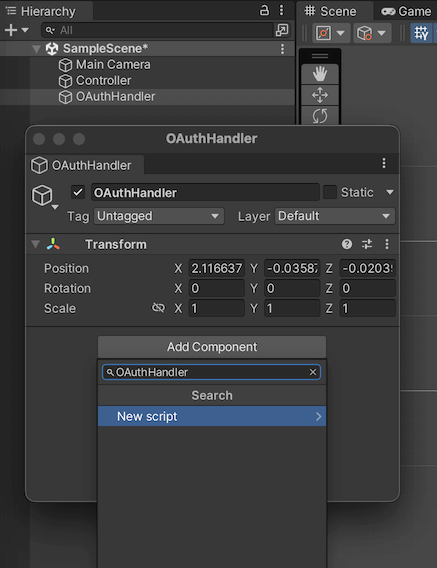
Create an empty game object (Unity Menu: GameObject -> Create Empty) in the scene and rename it to OAuthHandler. Then, add a new component by clicking the Add Component button in the Inspector, input OAuthHandler, and choose New script:
In the new OAuthHandler.cs, add the following code:
public void OnGoogleTokenReceived(UniWebViewAuthenticationGoogleToken token) {
    Debug.Log("Token received: " + token.AccessToken);
}

public void OnGoogleAuthError(long errorCode, string errorMessage) {
    Debug.Log("Error happened: " + errorCode + " " + errorMessage);
}
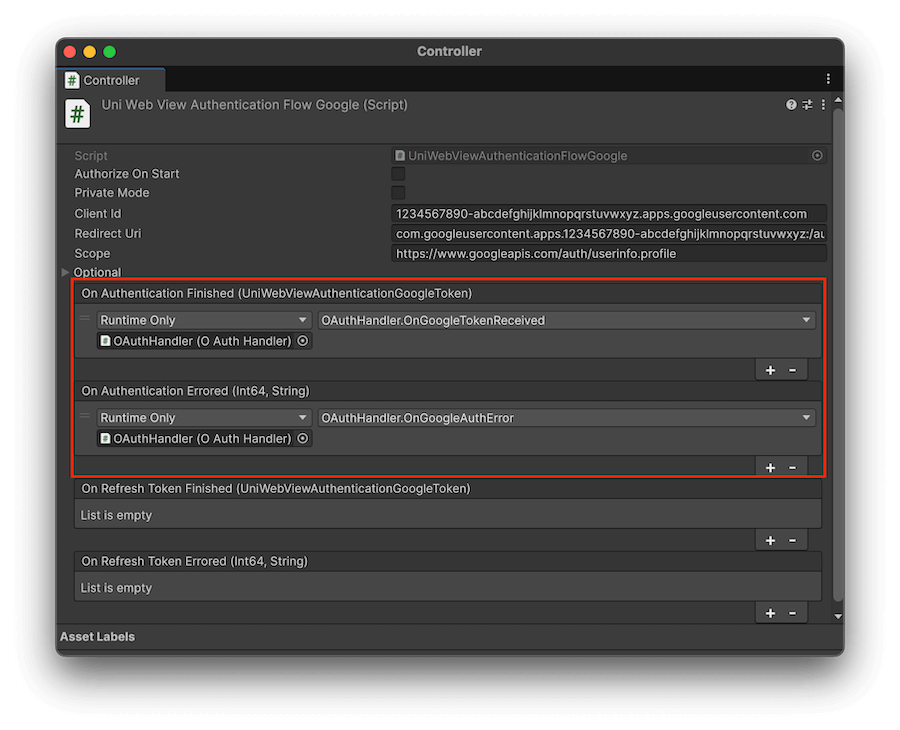
At last, go back to the object with UniWebViewAuthenticationFlowGoogle. Click the plus button in the On Authentication Finished and On Authentication Errored sections to create a callback. Then, drag the OAuthHandler object to the field and select its related methods:
Start Authenticating
Now, you can start the authentication flow by calling StartAuthentication of the UniWebViewAuthenticationFlowGoogle component.
To do this, first, you need to have a reference to the UniWebViewAuthenticationFlowGoogle. Add a new script component to the same game object where the UniWebViewAuthenticationFlowGoogle is located. Then, in the newly added script, add the following code in the Start() method:
void Start() {
    var googleFlow = GetComponent<UniWebViewAuthenticationFlowGoogle>();
    googleFlow.StartAuthenticationFlow();
}
TIP
Alternative, you can turn on the "Authorize On Start" option in the UniWebViewAuthenticationFlowGoogle component. It provides an easy way if you want to start the authentication flow automatically when the component starts.
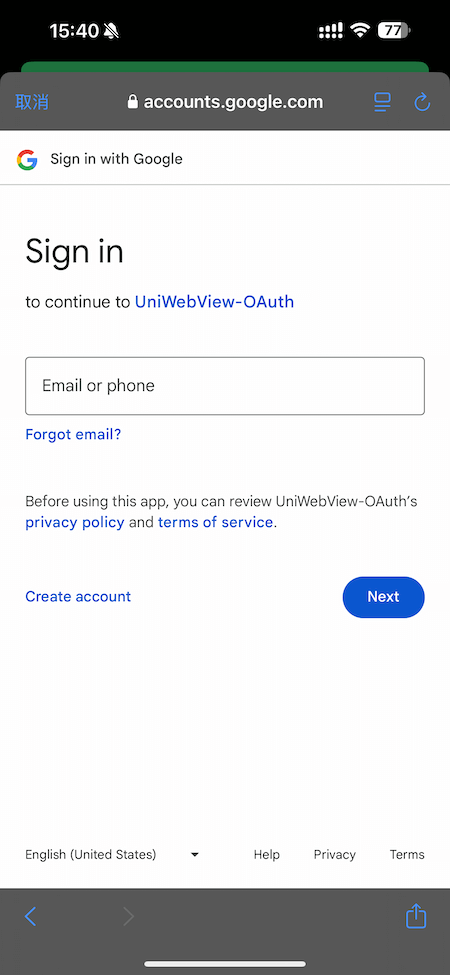
The Google authentication should work now. By running the scene, a web view will open and navigate to the Google authorization page. You can now log in with your Google account and receive a valid access token in the OnGoogleTokenReceived callback:
When log in successfully, you can find the following console log with the retrieved access token:
Token received: ${YOUR_ACCESS_TOKEN}
Store & Read the Token
Sometimes, you may want to store the token locally. UniWebView, as a web view component with OAuth support, does not provide any storage for the token. You will need to implement this yourself.
You can read the RawValue string of the token, and store it on the device or on your server. Remember the token is sensitive data, you should not store it in plain text. Usually, it is a good idea to encrypt it before storing it.
There are several ways to encrypt and store a string in Unity, for example, the SecurePlayerPrefs is a good one.
When you need to use the token, you can read the raw string value from the storage and create a new UniWebViewAuthenticationStandardToken object:
var rawValue = // Read the raw value from the storage
var token = new UniWebViewAuthenticationGoogleToken(rawValue);

// Or, if you are using a subclass of UniWebViewAuthenticationStandardToken, use its `Parse` method:
var token = UniWebViewAuthenticationTokenFactory<UniWebViewAuthenticationGoogleToken>.Parse(rawValue);