OAuth 2.0 General
UniWebView supports OAuth 2.0 for multiple providers, offering customizable flows and secure authentication methods.
Overview
UniWebView provides support for OAuth 2.0 authorization code flow. It contains built-in support for several popular OAuth 2.0 providers by following their options, which are:
| Service Provider | UniWebView Auth Class | Provider Documentation |
|---|---|---|
| UniWebViewAuthenticationFlowGoogle | OAuth 2.0 for Mobile & Desktop Apps | |
| UniWebViewAuthenticationFlowFacebook | Manually Build a Login Flow | |
| UniWebViewAuthenticationFlowTwitter | Authentication | |
| GitHub | UniWebViewAuthenticationFlowGitHub | Authorizing OAuth Apps |
| Discord | UniWebViewAuthenticationFlowDiscord | OAuth2 in Discord |
| LINE | UniWebViewAuthenticationFlowLine | LINE Login v2.1 API reference |
Besides of them, UniWebView also a customizable common setup for any other services which provides a standard OAuth 2.0 code flow.
UniWebView follows the OAuth 2.0 standard and use a secure way to perform authentication. It supports both state verification and PKCE challenge out-of-the-box, which simplifies your work and improves the security a lot.
In this guide, we will cover both and show you how to have your users login to a service with OAuth 2.0.
All services names and trademarks are property of their respective owners in this guide.
Checking Availability
This feature is not available on all UniWebView supporting platforms. On Apple's devices, it only works on iOS 11, macOS 10.15 and later. On Android, it requires the similar environment as Safe Browsing Mode.
Target API Level higher than Android 11
On Android, if you set your Target API Level to Android 11 (30) or later, you need to add the correct intent query explicitly in your AndroidManifest.xml file, to follow the Package Visibility to add queries as a sub-node of the manifest tag:
<manifest>
  // ...

  </application>

  <queries>
    <intent>
      <action android:name="android.support.customtabs.action.CustomTabsService" />
    </intent>
  </queries>
</manifest>
Package Visibility from Android 11
If you are setting Target API Level higher than Android 11 (API Level 30), but not setting the queries in your AndroidManifest.xml, the OAuth 2.0 related APIs will not work expectedly on Android.
Runtime Checking
To check if OAuth 2.0 feature is available at runtime, call IsAuthenticationSupported like this:
if (UniWebViewAuthenticationSession.IsAuthenticationSupported) {
    // OAuth 2.0 code flow is available on the current device.
}
This IsAuthenticationSupported property returns true on Android with customize tabs, iOS 11, macOS 10.15 and later. You should always check whether this feature is available before using it. Only continue to use OAuth 2.0 feature when this value is true. Otherwise, the authentication flow may not even start.
Built-In Providers
For built-in supported providers mentioned above, each provider has a dedicated class responsible for the authentication flow. We provided some step-to-step guide for integrating some providers to your app. Please refer the articles below for detail.
- OAuth 2.0 with Google
- OAuth 2.0 with GitHub
For other providers, most of the settings are the same or similar. For the provider-specific settings, please refer to the API reference of each class to know more details.
Other Properties
For other OAuth 2.0 providers which are not mentioned in the step-by-step guide, you should be able to perform the auth in the similar way, by setting the responsive fields like "Client Id" and "Callback Url", etc. There are also some common fields between different providers. In this section, we introduce them briefly.
Authorize On Start
Normally, you need to call StartAuthenticationFlow to display the web view for login form.
When this is enabled, the authentication flow will start automatically when the component starts (in the Start() method).
Private Mode
The system will remember the session for a certain service. Unless the user logs out from the service in the web view, it will just reuse the last credentials if available when the user tries to log in again. To disable this behavior and allow the user to choose another account, set the "Private Mode" option to "true".
VERSIONS
When enabled, the web view will try to open the authorization page in private (incognito) mode.
On iOS, this works on iOS 13 and later.
On Android, it is not always available but depends on the Chrome version and might require users to enable the incognito mode (and support for third-party use) in Chrome's settings. Check settings with chrome://flags/#cct-incognito and chrome://flags/#cct-incognito-available-to-third-party in Chrome to see the current status.
Customize Flow
Besides the built-in supported OAuth 2.0 providers, you can also use the common flow to let your user log in to any standard OAuth 2.0 provider. To adapt to a common flow, add the UniWebViewAuthenticationFlowCustomize component instead, and set the necessary properties like "Authorization Endpoint", "Token Endpoint", "Client Id" and other more:
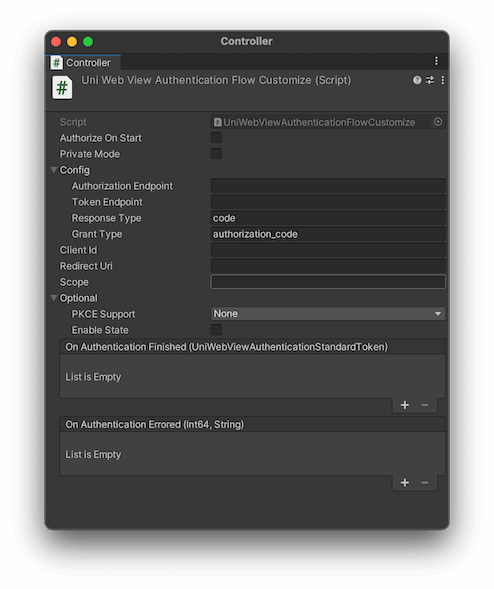
Usually, you can find these necessary entry points information in the service provider documentation.
To receive the authorization result, set the success handler parameter to UniWebViewAuthenticationStandardToken:
public void CustomizeOAuthDone(UniWebViewAuthenticationStandardToken token) {
    Debug.Log("Token received: " + token.AccessToken);
}

public void CustomizeOAuthFailed(long errorCode, string errorMessage) {
    Debug.Log("Error happened: " + errorCode + " " + errorMessage);
}
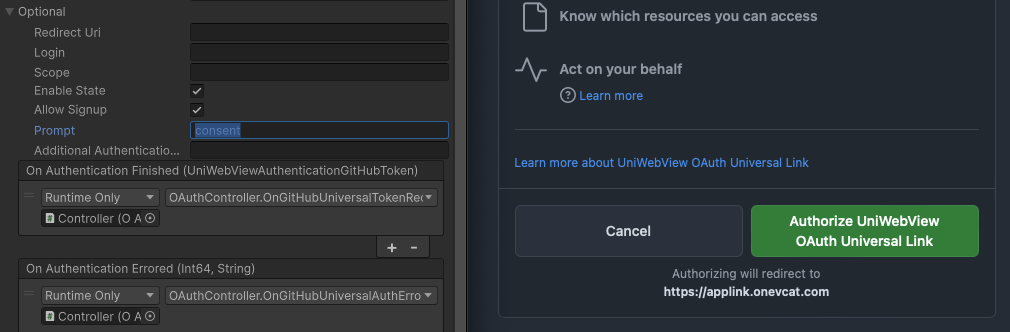
Universal Link as callback URL
You can also use an iOS Universal Link or Android App Link that starts with https as the callback URL for most of the providers. Ensure that the Universal Link or App Link is correctly configured both in your app and on your website.
Keep in mind that the Universal Link or App Link must be triggered by user action. Some OAuth providers automatically redirect to the callback URL if the user is already logged in, which may prevent the app from opening. To handle this, you should set the prompt value in the "Optional" section to something like "consent". This will prompt the user to click the authentication button, allowing the app to open via the https callback URL.